Categories
Google chrome Software

Removing google Chrome drop down in tab bar – March 2024

Updated chrome to 123.0.6312.58, and they re added the drop down in the top left, again. OY, this is getting old Google. They need to stop forcing these UX changes. If you see this:

and want to remove it, open up a new tab in chrome and go to chrome://flags and disable “Customize Chrome Side Panel” If this is your first time dealing with these changes, also disable “Chrome Refresh 2023“. Once done, it will look like this:

Relaunch chrome and the drop downs in the tab bar is gone.

Categories
Operating Systems

Did you get a Windows configuration update for Windows 11?

Did you received a Windows configuration update for Windows 11 on September 13th 2023 or so? I noticed this on 3 of my Windows 11 22H2 computers. This one was weird, typically there is a request for reboot based on a KB and lets you know. This one had no information regarding what it was related to.

Looking at my Windows update history (Search for Update History on your search bar), it is likely KB5030219 or KB5031217 . If you click on those links, it will direct you to the Microsoft KB and details as to what it likely was related to.

Let me know if I am wrong, but I am guessing this is likely what that meant.

Categories
cPanel

Email accounts disappeared in cPanel

I am unsure why, but most likely this comes through via some sort of exploit of a plugin a user has. I have seen email accounts disappear in cPanel users email accounts page. Yet their email functions fine. I found this article and it spoke a little about the issue:

https://support.cpanel.net/hc/en-us/articles/360052477034-Email-accounts-are-missing

I found it was easiest to lay it out. My example shows user anthony@vivithemage.com was not there, and this is how to restore it. If you have the passwd file or if you recall what the usernames of the email accounts should be, you can get them back showing in cPanel to modify them. This will show you what user had an email account:

[root@madhost613 vivithemage.com]# cat /home/vivithem/etc/vivithemage.com/passwd
anthony:x:671:673::/home/vivithem/mail/vivithemage.com/anthony:/usr/local/cpanel/bin/noshell
[root@madhost613 vivithemage.com#

Or you can pull it out from your email_accounts.json file:

[root@madhost613 vivithemage.com]# cat /home/vivithem/.cpanel/email_accounts.json
{"vivithemage.com":{"quota_mtime":1676555934,"disk_mtime":1676530335,"account_count":1,"shadow_mtime":1676555934,"accounts":{"anthony":{"suspended_login":0,"disk_mtime":1494927201,"diskused":"8041555","diskmtime":1676530335}}},"__version":3,"vivithemage.net":{"accounts":{},"account_count":0},"vivithemage.org":{"accounts":{},"account_count":0}}
[root@madhost613 vivithemage.com]#

now create a new shadow file in the correct directory and change ownership to the ACCOUNT. In my case it is:

cd /home/vivithem/etc/vivithemage.com/
chown vivithem:vivithem shadow

and dump this line in for EACH user missing:

anthony:$6$eGMpFjEJEI3349z3$.dhfm1rs/ftxFa8Rt8zs4yAA5dHCBdOb7P2T42Pwi/i5GpXb45BjoXiDccRbtmrwwoQkAHWF3mOwOouloYvvS1:18635::::::

If you have a second user with Elyssa you would now have this:

anthony:$6$eGMpFjEJEI3349z3$.dhfm1rs/ftxFa8Rt8zs4yAA5dHCBdOb7P2T42Pwi/i5GpXb45BjoXiDccRbtmrwwoQkAHWF3mOwOouloYvvS1:18635::::::
elyssa:$6$eGMpFjEJEI3349z3$.dhfm1rs/ftxFa8Rt8zs4yAA5dHCBdOb7P2T42Pwi/i5GpXb45BjoXiDccRbtmrwwoQkAHWF3mOwOouloYvvS1:18635::::::

replace anthony with your username missing from passwd. The hash following is irrelevant, because once you do this, you can change the password via cPanel as you would normally.

Once done this auto populates them in cPanel with no restarts required. It’s a bit of a manual process, but at least this way you can get back on with your life and reset passwords.

Categories
Operating Systems

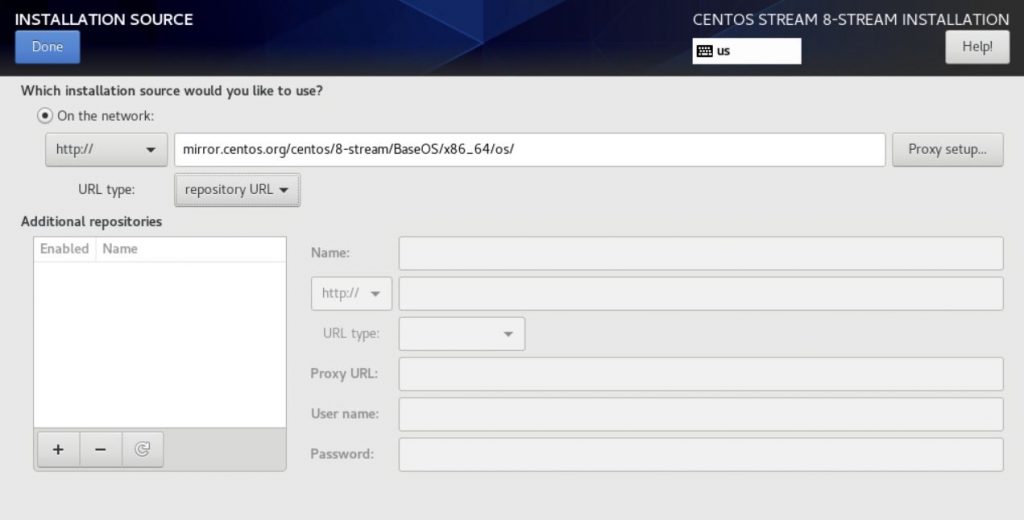
CentOS 8 Stream Error setting up base repository

This is a super simple fix. If you are trying to set up a centos 8 stream server with just the boot iso and the internet. You need to select the repo that it can pick from so you can get your packages. When you are selecting your isntallation source, the “on the network” source you can pick for a repository URL is:

mirror.centos.org/centos/8-stream/BaseOS/x86_64/os/

Select done and then you can select your packages. My go to is a minimal install, then you can continue your installation.

Categories
linux minecraft

Minecraft Bedrock Server on CentOS 8 Stream error with libnsl.so.1

My Minecraft server was working great on my CentOS 8 Stream server for a few months. Then an update they must have added or modified a dependency. When I would go to start it, it would throw:

./bedrock_server: error while loading shared libraries: libnsl.so.1: cannot open shared object file: No such file or directory

Did a little googling and discovered I needed to install libnsl package:

dnf install libnsl

Once I did that, I was back up and running! Hopefully this helps someone else.

Categories
Software

WHMCS remove NS1 and NS2 prefix

This one was bothering me for some reason. When you select the product type in your WHMCS Products/Services as Server/VPS it adds this NS1 and NS2 requirement. Which are just nameservers, it makes no sense! So if you change it from Server/VPS to OTHER the option goes away. If you have modules and other configurable options enabled, they’re all still there and work. Seems silly, but I reached out to WHMCS to ask why it exists in the first place.

Do know, this removes the hostname as well. If you want to keep hostname, you have the ability to hide NS1 and NS2 prefix’s and prepulate them instead. You would leave your Product/Service as Server/VPS and then make these changes:

The fields can be hidden by editing the /templates/orderforms/your_active_template/configureproduct.tpl file.

To remove one or more of the default fields on your order form entirely, you can change the field type to hidden and supply a unique value.

For example:

Find:

<label for="inputNs1prefix">{$LANG.serverns1prefix}</label>
<input type="text" name="ns1prefix" class="form-control" id="inputNs1prefix" value="{$server.ns1prefix}" placeholder="ns1">


<label for="inputNs2prefix">{$LANG.serverns2prefix}</label>
<input type="text" name="ns2prefix" class="form-control" id="inputNs2prefix" value="{$server.ns2prefix}" placeholder="ns2">

Replace with:

<!-- <label for="inputNs1prefix">{$LANG.serverns1prefix}</label> -->
<input type="hidden" name="ns1prefix" class="form-control" id="inputNs1prefix" value="host{$smarty.now}" placeholder="ns1">


<!-- <label for="inputNs2prefix">{$LANG.serverns2prefix}</label> -->
<input type="hidden" name="ns2prefix" class="form-control" id="inputNs2prefix" value="host{$smarty.now}" placeholder="ns2">


It is recommended to create your own custom order form to preserve changes through any upgrades – http://docs.whmcs.com/Order_Form_Templates#Creating_a_Custom_Order_Form_Template

Hopefully this helps someone, enjoy!

Categories
Android Android Google

Disable profanity filter in Android 10

This is such a silly thing to have to disable, but any time I was using voice to text, it would always put asterisks for swear words. This is on my Google Pixel 3 XL running Android 10 latest update of Feb 2020. The fix was to disable it in THREE spots, not just one, not just two, but all three. The three spots are: Gboard, Google voice typing, and in the text correction section.

Section #1 Google Voice Typing:

Settings > System > Languages & input > Virtual keyboard > Google voice typing and make sure that Hide offensive words is disabled.

Section #2: Gboard

Settings > System > Languages & input > Virtual keyboard > Board -> Voice Typing -> Offline speech recognition and make sure that Hide offensive words is disabled.

Section #3: Text Correction

Settings > System > Languages & input > Virtual keyboard > Board -> Text Correction and make sure that Block offensive words is disabled.

Section #4: UPDATED (Added April 21 2020)

If those three options do NOT resolve it, the 4th option you can use is to disable offline voice: Settings > System > Languages & input > Virtual keyboard > Gboard > Voice Typing > and disable “faster voice typing“.

Categories
Operating Systems Windows 10

Quick and dirty robocopy script to back up directory

I used to have an xcopy script that ran this, but now I have upgraded to using robocopy to mirror my files to a network share that I disconnect and put in cold storage when not actually backing up.

robocopy E:\ \\192.168.50.30\backup\ /E /XD “System Volume Information” “$RECYCLE.BIN” “found.00*” /MIR

Break down of the script: E: is the SOURCE of my files and \\192.168.50.30\backup\ is my DESTINATION to copy TO. If you not the XD trigger, that EXCLUDES certain files. I want to ignore certain system files that do not matter to my back ups. You can do this for nearly any directory. /MIR is what actually MIRRORS the files, so they will look exactly like what you have on your SOURCE directory structure.

The only downside is there is no versioning with this, what you see is what you get, so if you were struck with some randomsware, this won’t save you. You would want something like seafile, or some other back up service. If there’s any interest, I can make a post on how to create a seafile server to do your back ups and version control. It has the added benefit of having versioning, browser accessible, and phone applications.

Categories
Server 2019

Windows Server 2019 Eval to Server Standard

I had issues converting an Eval server 2019 to a Standard Server 2019, and for whatever reason, it was painful to find the solution. Someone on reddit actually posted about it, so here is me documenting it for posterity!

# ISO Used: 17763.253.190108-0006.rs5_release_svc_refresh_SERVER_EVAL_x64FRE_en-us.iso

# Commands Executed:

DISM /online /Get-CurrentEdition
DISM /online /Get-TargetEditions
DISM /online /Set-Edition:ServerStandard /ProductKey:N69G4-B89J2-4G8F4-WWYCC-J464C /AcceptEULA

slmgr.vbs /upk
slmgr.vbs /ipk <MAK_KEY_HERE>
slmgr.vbs /ato

# Initial Product Key is GVLK (unable to find official source at present)

Unofficial GVLK Source

ProductGVLK
Windows Server 2019 DatacenterWMDGN-G9PQG-XVVXX-R3X43-63DFG
Windows Server 2019 StandardN69G4-B89J2-4G8F4-WWYCC-J464C
Windows Server 2019 EssentialsWVDHN-86M7X-466P6-VHXV7-YY726
Windows Server 2019 Azure CoreFDNH6-VW9RW-BXPJ7-4XTYG-239TB
Windows Server 2019 Datacenter Semi-Annual Channel (v.1809)6NMRW-2C8FM-D24W7-TQWMY-CWH2D
Windows Server 2019 Standard Semi-Annual Channel (v.1809)N2KJX-J94YW-TQVFB-DG9YT-724CC
Windows Server 2019 ARM64GRFBW-QNDC4-6QBHG-CCK3B-2PR88
Categories
vmware

Easiest way to install ESXi offline without any issues

I kept getting disk full issues when upgrading esx, this is such a silly error, and I really had no way around it outside of loading esx from a full iso and ilo in to boot. But I found a somewhat easier way to do it now via SSH and the upgrade update file.

  1. download the zip file from: https://my.vmware.com/group/vmware/patch#search
  2. upload it to a datastore
  3. Renamed it to update.zip – not required, but makes it easier
  4. esxcli software vib update -d /vmfs/volumes//update.zip
  5. reboot
  6. If complete, go ahead and delete the file if you want to reclaim the space.