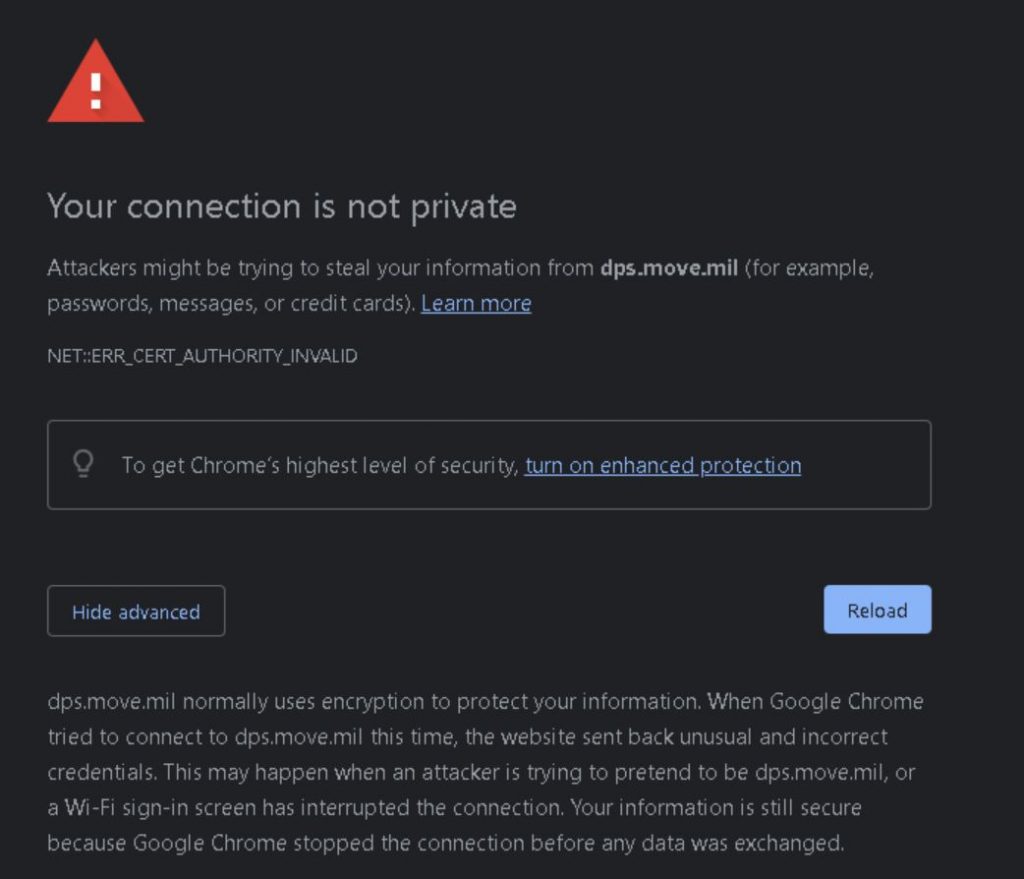
Categories
Gaming Nintendo Switch

Connect a Nintendo switch to a bedrock server

I just bought a Nintendo Switch and was trying to play cross platform with my buddies on PC. The non-java version of Minecraft. So I set up a minecraft server running bedrock and did a tcpdump on my router to where my Switch was trying to connect to. It attempts to connect to mco.lbsg.net. So I pointed that DNS entry on my dnsmasq server to my bedrock server public address and my switch now lets me connect to it and I can play on that server.

Hopefully this gets fixed at some point or let’s us Switch players connect to bedrock servers directly.

Categories
Cisco General Computing

Looking up Cisco ASA5506 timebomb Field Notice – FN64228

(UPDATED APRIL 2021) – As the link was broken and now fixed) I don’t know why this isn’t plastered on cisco.com, but you can go to here and throw a serial number in and see if it’s affected by the timebomb that the C2000 CPU’s cause. This seems specific to the 5506x, there are other search tools and field notices at cisco to determine if your hardware is affected.

https://snvui.cisco.com/snv/FN64228

If you need to grab your SN, type show inv and it’ll spit out SN and version. I’ve found a bunch of V02 are unaffected, based on that lookup tool.

madfw5# show inv
Name: "Chassis", DESCR: "ASA 5506-X with FirePOWER services, 8GE, AC, DES"
PID: ASA5506           , VID: V04     , SN: JMX2xxxxxx

Name: "Storage Device 1", DESCR: "ASA 5506-X SSD"
PID: ASA5506-SSD       , VID: N/A     , SN: MSAxxxxxxxx

madfw5# 
Categories
Software

WHMCS remove NS1 and NS2 prefix

This one was bothering me for some reason. When you select the product type in your WHMCS Products/Services as Server/VPS it adds this NS1 and NS2 requirement. Which are just nameservers, it makes no sense! So if you change it from Server/VPS to OTHER the option goes away. If you have modules and other configurable options enabled, they’re all still there and work. Seems silly, but I reached out to WHMCS to ask why it exists in the first place.

Do know, this removes the hostname as well. If you want to keep hostname, you have the ability to hide NS1 and NS2 prefix’s and prepulate them instead. You would leave your Product/Service as Server/VPS and then make these changes:

The fields can be hidden by editing the /templates/orderforms/your_active_template/configureproduct.tpl file.

To remove one or more of the default fields on your order form entirely, you can change the field type to hidden and supply a unique value.

For example:

Find:

<label for="inputNs1prefix">{$LANG.serverns1prefix}</label>
<input type="text" name="ns1prefix" class="form-control" id="inputNs1prefix" value="{$server.ns1prefix}" placeholder="ns1">


<label for="inputNs2prefix">{$LANG.serverns2prefix}</label>
<input type="text" name="ns2prefix" class="form-control" id="inputNs2prefix" value="{$server.ns2prefix}" placeholder="ns2">

Replace with:

<!-- <label for="inputNs1prefix">{$LANG.serverns1prefix}</label> -->
<input type="hidden" name="ns1prefix" class="form-control" id="inputNs1prefix" value="host{$smarty.now}" placeholder="ns1">


<!-- <label for="inputNs2prefix">{$LANG.serverns2prefix}</label> -->
<input type="hidden" name="ns2prefix" class="form-control" id="inputNs2prefix" value="host{$smarty.now}" placeholder="ns2">


It is recommended to create your own custom order form to preserve changes through any upgrades – http://docs.whmcs.com/Order_Form_Templates#Creating_a_Custom_Order_Form_Template

Hopefully this helps someone, enjoy!

Categories
Linux

Writing multiple lines of code to a file in linux

Sometimes it’s needed to create multiple files, repeatadly with linux. This should work with any of the major distros: CentOS, Ubuntu, Fedora, Debian, etc.

This also assumes the file does not exist already, if it does exist, it will append this info to the end of the file that already exists.

cat >> ifcfg-eth0 << EOF
TYPE=Ethernet
DEVICE=eth0
BOOTPROTO=none
ONBOOT=yes
EOF

You can now type cat ifcfg-eth0 and it will output the 4 lines above.

If that is not to your liking, you could always use something like echo with append statements. Like this:

echo "TYPE=Ethernet" >> ifcfg-eth0
echo "DEVICE=eth0" >> ifcfg-eth0
echo "BOOTPROTO=none" >> ifcfg-eth0
echo "ONBOOT=yes" >> ifcfg-eth0

The >> option appends the echo information into a file name. But if you do > it will overwrite all lines in the file.

Enjoy!

Categories
General Computing

Combating malware, ransomware, password management, and general good online practices

If you want to stop against ransomware, you need to have offsite, incremental backups. This will solve a lot of problems, and give you piece of mind that files are backed up off site as well, for other issues. Fires, floods, failed hardware, etc.

If you want to stop against malware or getting the ransomware in the first place, you need to follow safe browsing habits. Get plugins for your browser that block malicious content, or URL’s. Plugins like ublock origin, HTTPS Everywhere, Ghostery, etc. You can take it a step further and install a pihole DNS server to handle all devices behind your networks requests. You should also make sure your anti virus is up to date. If you are on Windows 10, the build in Windows Defender is actually one of the best, so keep that updated.

If you want to stop against getting into your accounts with poor passwords, or re used passwords. You need to follow better password management practices for different accounts. You can go as far as password management with a tool like keepass (local), or lastpass (web based). If you want to be proactive, change your password every so often. But as long as you have a long and complex password (20+ characters), you are in better shape then most. 

When logging into websites, make sure they have an SSL lock on the top left, and that the certificate is valid, any browser will tell you if the session is secure.

If you have a laptop with a built in webcam I would advise getting a cover overit. They make nicer ones online, or you can just use electrical tape.

Enjoy, stay safe :).

Categories
Linux

CentOS 7 multiple VLANs on one interface

OK, so this was something I needed to do with CentOS 6: https://vivithemage.com/2014/08/08/centos-6-multiple-vlans-with-one-eth-device/

This is how to do it in CentOS 7. There are some slight changes required compared to CentOS 6, but they’re nominal. It’s possible it will work for CentOS 8, but it is untested. Where there is a command like vi bla/bla/file you will enter the following information in the line.

vi /etc/sysctl.conf
net.ipv4.ip_forward = 1
net.ipv4.conf.default.accept_source_route = 1
net.ipv4.conf.all.accept_source_route = 1

cd /etc/sysconfig/network-scripts/

vi ifcfg-em1
TYPE=Ethernet
DEVICE=em1
BOOTPROTO=none
ONBOOT=yes

vi ifcfg-em1.29
DEVICE=em1.29
BOOTPROTO=none
ONBOOT=yes
IPADDR=192.119.161.2
PREFIX=24
NETWORK=192.119.161.0
GATEWAY=192.119.161.1
VLAN=yes
ARPCHECK=no
NM_CONTROLLED=no

vi ifcfg-em1.33
DEVICE=em1.33
BOOTPROTO=none
ONBOOT=yes
IPADDR=192.119.165.2
PREFIX=24
GATEWAY=192.119.165.1
NETWORK=192.119.165.0
VLAN=yes
ARPCHECK=no
NM_CONTROLLED=no

vi ifcfg-em1.35
DEVICE=em1.35
BOOTPROTO=none
ONBOOT=yes
IPADDR=192.119.167.2
PREFIX=24
NETWORK=192.119.167.0
GATEWAY=192.119.167.1
VLAN=yes
ARPCHECK=no
NM_CONTROLLED=no

vi ifcfg-em1.29-range
IPADDR_START=192.119.161.3
IPADDR_END=192.119.161.254
PREFIX=24
CLONENUM_START=3
ARPCHECK=no

vi ifcfg-em1.33-range
IPADDR_START=192.119.165.3
IPADDR_END=192.119.165.254
NETMASK=255.255.255.0
CLONENUM_START=254
ARPCHECK=no

vi ifcfg-em1.35-range
IPADDR_START=192.119.167.3
IPADDR_END=192.119.167.254
NETMASK=255.255.255.0
CLONENUM_START=506
ARPCHECK=no

echo ‘default via 192.119.161.1 dev em1.29 table 1’ > route-em1.29
echo ‘default via 192.119.165.1 dev em1.33 table 2’ > route-em1.33
echo ‘default via 192.119.167.1 dev em1.35 table 3’ > route-em1.35
echo ‘from 192.119.161.2 tab 1 priority 500’ > rule-em1.29
echo ‘from 192.119.165.2 tab 2 priority 501’ > rule-em1.33
echo ‘from 192.119.167.2 tab 3 priority 502’ > rule-em1.35
echo ‘from 192.119.161.0/24 table 1’ >> rule-em1.29
echo ‘from 192.119.165.0/24 table 2’ >> rule-em1.33
echo ‘from 192.119.167.0/24 table 3’ >> rule-em1.35
THIS WORKS FOR TESTING
ip route add default via 192.119.161.1 dev em1.29 table 1
ip route add default via 192.119.165.1 dev em1.33 table 2
ip route add default via 192.119.167.1 dev em1.35 table 3
ip rule add from 192.119.161.2 tab 1 priority 500
ip rule add from 192.119.165.2 tab 2 priority 501
ip rule add from 192.119.167.2 tab 3 priority 502
ip rule add from 192.119.161.0/24 table 1
ip rule add from 192.119.165.0/24 table 2
ip rule add from 192.119.167.0/24 table 3
THIS IS REQUIRED TO PING DURING TEST – THIS ONE WIL NOT SUSTAIN REBOOT
ip route add default via 198.50.31.1
## THIS WILL SUSTAIN REBOOT – ONLY NEEDED FOR TESTING
echo 'default via 198.50.31.1' > route-em1.15
### END TESTING STUFFS
Categories
Linux

cPanel absolute path for SFTP back up

My back up server uses keys, and SSH to allow for backups. By default, in my cPanel server running CENTOS 7.7 with v86.0.18 of cPanel, you really only have the option to do a path related to the SSH user’s home log in directory. My back up server has a mount point outside of /home/user/ so I needed to find a way to force it to go to /data/madhost613/ as an example.

Once you create your SFTP back up options under “backup settings” in the cPanel GUI, you can create an “additional destinations”. This will allow your back ups to be sent somewhere else.

I would advise using key based authentication when you set up SFTP as a destination. It is far more secure then password based authentication. Once you set up your SFTP and have validated it, SSH into your SOURCE server running cPanel to make the change to the validation configuration file. It should be in: /var/cpanel/backups/ The file itself will look simliar to this: backups_link_data_drive_UID_vxxxxxxxxxxxxxxxxxxxxxx Once you found it, edit it with your favorite editor. Which should be vi ;). In that configuration file is a path line, go ahead and modify it to your aboslute path. Mine now reads: path: /data/madhost613/ Some caveats with this, the SSH user must have r/w on that destination server. Once you make this change, you can run the validation in cPanel, and if successful, your back ups will be sent to that directory now.

cPanel informed me this should be an added feature at some point, but currently unknown when. But this work around works fine.

Categories
Linux

Upgrading CentOS 6 to CentOS 7

I am shamelessly stealing this from: https://fsfe.soup.io/post/651104763/Evaggelos-Balaskas-System-Engineer-CentOS-Dist-Upgrade

I wanted to keep this information around if their site goes tits up. I did this on a newly installed Cent OS 6.10 upgrade as of this morning and it worked fine. I had not tried it with odd packages installed, or abnormally outdated packages, so your mileage may vary. Good luck, and as always, no one “supports” this procedure, the best option to upgrade is a CLEAN install to CENTOS 8. At this point 8 is tried and true and will keep your server supported longer.

PRE TASKS

There are some tasks you can do to prevent from unwanted results. Like:

  • Disable selinux
  • Remove unnecessary repositories
  • Take a recent backup!

CENTOS UPGRADE REPOSITORY

Create a new centos repository:

cat > /etc/yum.repos.d/centos-upgrade.repo <<EOF
[centos-upgrade]
name=centos-upgrade
baseurl=https://buildlogs.centos.org/centos/6/upg/x86_64/
enabled=1
gpgcheck=0
EOF

INSTALL PRE-UPGRADE TOOL

First install the openscap version from dev.centos.org:

# yum -y install https://buildlogs.centos.org/centos/6/upg/x86_64/Packages/openscap-1.0.8-1.0.1.el6.centos.x86_64.rpm

then install the redhat upgrade tool:

# yum -y install redhat-upgrade-tool preupgrade-assistant-*

IMPORT CENTOS 7 PGP KEY

# rpm --import http://mirror.centos.org/centos/7/os/x86_64/RPM-GPG-KEY-CentOS-7

NOTE:

to bypass errors like:

Downloading failed: invalid data in .treeinfo: No section: ‘checksums’

append CentOS Mirror under mirrorlist:

mkdir -pv /var/tmp/system-upgrade/base/ /var/tmp/system-upgrade/extras/ /var/tmp/system-upgrade/updates/

echo http://mirror.centos.org/centos/7/os/x86_64/ >> /var/tmp/system-upgrade/base/mirrorlist.txt
echo http://mirror.centos.org/centos/7/extras/x86_64/ >> /var/tmp/system-upgrade/extras/mirrorlist.txt
echo http://mirror.centos.org/centos/7/updates/x86_64/ >> /var/tmp/system-upgrade/updates/mirrorlist.txt

PRE-UPGRADE

preupg is actually a python script!

# yes | preupg -v
Preupg tool doesn't do the actual upgrade.
Please ensure you have backed up your system and/or data in the event of a failed upgrade
that would require a full re-install of the system from installation media.
Do you want to continue? y/n
Gathering logs used by preupgrade assistant:
All installed packages : 01/11 ...finished (time 00:00s)
All changed files : 02/11 ...finished (time 00:18s)
Changed config files : 03/11 ...finished (time 00:00s)
All users : 04/11 ...finished (time 00:00s)
All groups : 05/11 ...finished (time 00:00s)
Service statuses : 06/11 ...finished (time 00:00s)
All installed files : 07/11 ...finished (time 00:01s)
All local files : 08/11 ...finished (time 00:01s)
All executable files : 09/11 ...finished (time 00:01s)
RedHat signed packages : 10/11 ...finished (time 00:00s)
CentOS signed packages : 11/11 ...finished (time 00:00s)
Assessment of the system, running checks / SCE scripts:
001/096 ...done (Configuration Files to Review)
002/096 ...done (File Lists for Manual Migration)
003/096 ...done (Bacula Backup Software)
...
./result.html
/bin/tar: .: file changed as we read it
Tarball with results is stored here /root/preupgrade-results/preupg_results-180508202952.tar.gz .
The latest assessment is stored in directory /root/preupgrade .
Summary information:
We found some potential in-place upgrade risks.
Read the file /root/preupgrade/result.html for more details.
Upload results to UI by command:
e.g. preupg -u http://127.0.0.1:8099/submit/ -r /root/preupgrade-results/preupg_results-*.tar.gz .
this must finish without any errors.

CENTOS UPGRADE TOOL

We need to find out what are the possible problems when upgrade:

# centos-upgrade-tool-cli --network=7 --instrepo=http://vault.centos.org/7.0.1406/os/x86_64/

Then by force we can upgrade to it’s latest version:

# centos-upgrade-tool-cli --force --network=7 --instrepo=http://vault.centos.org/7.0.1406/os/x86_64/ --cleanup-post

Output:

setting up repos...
base | 3.6 kB 00:00
base/primary_db | 4.9 MB 00:04
centos-upgrade | 1.9 kB 00:00
centos-upgrade/primary_db | 14 kB 00:00
cmdline-instrepo | 3.6 kB 00:00
cmdline-instrepo/primary_db | 4.9 MB 00:03
epel/metalink | 14 kB 00:00
epel | 4.7 kB 00:00
epel | 4.7 kB 00:00
epel/primary_db | 6.0 MB 00:04
extras | 3.6 kB 00:00
extras/primary_db | 4.9 MB 00:04
mariadb | 2.9 kB 00:00
mariadb/primary_db | 33 kB 00:00
remi-php56 | 2.9 kB 00:00
remi-php56/primary_db | 229 kB 00:00
remi-safe | 2.9 kB 00:00
remi-safe/primary_db | 950 kB 00:00
updates | 3.6 kB 00:00
updates/primary_db | 4.9 MB 00:04
.treeinfo | 1.1 kB 00:00
getting boot images...
vmlinuz-redhat-upgrade-tool | 4.7 MB 00:03
initramfs-redhat-upgrade-tool.img | 32 MB 00:24
setting up update...
finding updates 100% [=========================================================]
(1/323): MariaDB-10.2.14-centos6-x86_64-client.rpm | 48 MB 00:38
(2/323): MariaDB-10.2.14-centos6-x86_64-common.rpm | 154 kB 00:00
(3/323): MariaDB-10.2.14-centos6-x86_64-compat.rpm | 4.0 MB 00:03
(4/323): MariaDB-10.2.14-centos6-x86_64-server.rpm | 109 MB 01:26
(5/323): acl-2.2.51-12.el7.x86_64.rpm | 81 kB 00:00
(6/323): apr-1.4.8-3.el7.x86_64.rpm | 103 kB 00:00
(7/323): apr-util-1.5.2-6.el7.x86_64.rpm | 92 kB 00:00
(8/323): apr-util-ldap-1.5.2-6.el7.x86_64.rpm | 19 kB 00:00
(9/323): attr-2.4.46-12.el7.x86_64.rpm | 66 kB 00:00
...
(320/323): yum-plugin-fastestmirror-1.1.31-24.el7.noarch.rpm | 28 kB 00:00
(321/323): yum-utils-1.1.31-24.el7.noarch.rpm | 111 kB 00:00
(322/323): zlib-1.2.7-13.el7.x86_64.rpm | 89 kB 00:00
(323/323): zlib-devel-1.2.7-13.el7.x86_64.rpm | 49 kB 00:00
testing upgrade transaction
rpm transaction 100% [=========================================================]
rpm install 100% [=============================================================]
setting up system for upgrade
Finished. Reboot to start upgrade.

REBOOT

The upgrade procedure, will download all rpm packages to a directory and create a new grub entry. Then on reboot the system will try to upgrade the distribution release to it’s latest version.

# reboot

Categories
Electronics General Computing

Dell Monitor fades when displaying dark content

This was eating me up! This kept happening on my Dell P2419H. Every time I would display a video or website with dark content, the monitor would start to dim, noticeably. The fix was rather simple, looks like there is an option for dynamic contrast, turn that off, and you are good. Check out this image, hopefully your Dell monitor has this option.

Categories
Android Android Google

Disable profanity filter in Android 10

This is such a silly thing to have to disable, but any time I was using voice to text, it would always put asterisks for swear words. This is on my Google Pixel 3 XL running Android 10 latest update of Feb 2020. The fix was to disable it in THREE spots, not just one, not just two, but all three. The three spots are: Gboard, Google voice typing, and in the text correction section.

Section #1 Google Voice Typing:

Settings > System > Languages & input > Virtual keyboard > Google voice typing and make sure that Hide offensive words is disabled.

Section #2: Gboard

Settings > System > Languages & input > Virtual keyboard > Board -> Voice Typing -> Offline speech recognition and make sure that Hide offensive words is disabled.

Section #3: Text Correction

Settings > System > Languages & input > Virtual keyboard > Board -> Text Correction and make sure that Block offensive words is disabled.

Section #4: UPDATED (Added April 21 2020)

If those three options do NOT resolve it, the 4th option you can use is to disable offline voice: Settings > System > Languages & input > Virtual keyboard > Gboard > Voice Typing > and disable “faster voice typing“.