Categories
Linux

cPanel absolute path for SFTP back up

My back up server uses keys, and SSH to allow for backups. By default, in my cPanel server running CENTOS 7.7 with v86.0.18 of cPanel, you really only have the option to do a path related to the SSH user’s home log in directory. My back up server has a mount point outside of /home/user/ so I needed to find a way to force it to go to /data/madhost613/ as an example.

Once you create your SFTP back up options under “backup settings” in the cPanel GUI, you can create an “additional destinations”. This will allow your back ups to be sent somewhere else.

I would advise using key based authentication when you set up SFTP as a destination. It is far more secure then password based authentication. Once you set up your SFTP and have validated it, SSH into your SOURCE server running cPanel to make the change to the validation configuration file. It should be in: /var/cpanel/backups/ The file itself will look simliar to this: backups_link_data_drive_UID_vxxxxxxxxxxxxxxxxxxxxxx Once you found it, edit it with your favorite editor. Which should be vi ;). In that configuration file is a path line, go ahead and modify it to your aboslute path. Mine now reads: path: /data/madhost613/ Some caveats with this, the SSH user must have r/w on that destination server. Once you make this change, you can run the validation in cPanel, and if successful, your back ups will be sent to that directory now.

cPanel informed me this should be an added feature at some point, but currently unknown when. But this work around works fine.

Categories
Linux

Upgrading CentOS 6 to CentOS 7

I am shamelessly stealing this from: https://fsfe.soup.io/post/651104763/Evaggelos-Balaskas-System-Engineer-CentOS-Dist-Upgrade

I wanted to keep this information around if their site goes tits up. I did this on a newly installed Cent OS 6.10 upgrade as of this morning and it worked fine. I had not tried it with odd packages installed, or abnormally outdated packages, so your mileage may vary. Good luck, and as always, no one “supports” this procedure, the best option to upgrade is a CLEAN install to CENTOS 8. At this point 8 is tried and true and will keep your server supported longer.

PRE TASKS

There are some tasks you can do to prevent from unwanted results. Like:

  • Disable selinux
  • Remove unnecessary repositories
  • Take a recent backup!

CENTOS UPGRADE REPOSITORY

Create a new centos repository:

cat > /etc/yum.repos.d/centos-upgrade.repo <<EOF
[centos-upgrade]
name=centos-upgrade
baseurl=https://buildlogs.centos.org/centos/6/upg/x86_64/
enabled=1
gpgcheck=0
EOF

INSTALL PRE-UPGRADE TOOL

First install the openscap version from dev.centos.org:

# yum -y install https://buildlogs.centos.org/centos/6/upg/x86_64/Packages/openscap-1.0.8-1.0.1.el6.centos.x86_64.rpm

then install the redhat upgrade tool:

# yum -y install redhat-upgrade-tool preupgrade-assistant-*

IMPORT CENTOS 7 PGP KEY

# rpm --import http://mirror.centos.org/centos/7/os/x86_64/RPM-GPG-KEY-CentOS-7

NOTE:

to bypass errors like:

Downloading failed: invalid data in .treeinfo: No section: ‘checksums’

append CentOS Mirror under mirrorlist:

mkdir -pv /var/tmp/system-upgrade/base/ /var/tmp/system-upgrade/extras/ /var/tmp/system-upgrade/updates/

echo http://mirror.centos.org/centos/7/os/x86_64/ >> /var/tmp/system-upgrade/base/mirrorlist.txt
echo http://mirror.centos.org/centos/7/extras/x86_64/ >> /var/tmp/system-upgrade/extras/mirrorlist.txt
echo http://mirror.centos.org/centos/7/updates/x86_64/ >> /var/tmp/system-upgrade/updates/mirrorlist.txt

PRE-UPGRADE

preupg is actually a python script!

# yes | preupg -v
Preupg tool doesn't do the actual upgrade.
Please ensure you have backed up your system and/or data in the event of a failed upgrade
that would require a full re-install of the system from installation media.
Do you want to continue? y/n
Gathering logs used by preupgrade assistant:
All installed packages : 01/11 ...finished (time 00:00s)
All changed files : 02/11 ...finished (time 00:18s)
Changed config files : 03/11 ...finished (time 00:00s)
All users : 04/11 ...finished (time 00:00s)
All groups : 05/11 ...finished (time 00:00s)
Service statuses : 06/11 ...finished (time 00:00s)
All installed files : 07/11 ...finished (time 00:01s)
All local files : 08/11 ...finished (time 00:01s)
All executable files : 09/11 ...finished (time 00:01s)
RedHat signed packages : 10/11 ...finished (time 00:00s)
CentOS signed packages : 11/11 ...finished (time 00:00s)
Assessment of the system, running checks / SCE scripts:
001/096 ...done (Configuration Files to Review)
002/096 ...done (File Lists for Manual Migration)
003/096 ...done (Bacula Backup Software)
...
./result.html
/bin/tar: .: file changed as we read it
Tarball with results is stored here /root/preupgrade-results/preupg_results-180508202952.tar.gz .
The latest assessment is stored in directory /root/preupgrade .
Summary information:
We found some potential in-place upgrade risks.
Read the file /root/preupgrade/result.html for more details.
Upload results to UI by command:
e.g. preupg -u http://127.0.0.1:8099/submit/ -r /root/preupgrade-results/preupg_results-*.tar.gz .
this must finish without any errors.

CENTOS UPGRADE TOOL

We need to find out what are the possible problems when upgrade:

# centos-upgrade-tool-cli --network=7 --instrepo=http://vault.centos.org/7.0.1406/os/x86_64/

Then by force we can upgrade to it’s latest version:

# centos-upgrade-tool-cli --force --network=7 --instrepo=http://vault.centos.org/7.0.1406/os/x86_64/ --cleanup-post

Output:

setting up repos...
base | 3.6 kB 00:00
base/primary_db | 4.9 MB 00:04
centos-upgrade | 1.9 kB 00:00
centos-upgrade/primary_db | 14 kB 00:00
cmdline-instrepo | 3.6 kB 00:00
cmdline-instrepo/primary_db | 4.9 MB 00:03
epel/metalink | 14 kB 00:00
epel | 4.7 kB 00:00
epel | 4.7 kB 00:00
epel/primary_db | 6.0 MB 00:04
extras | 3.6 kB 00:00
extras/primary_db | 4.9 MB 00:04
mariadb | 2.9 kB 00:00
mariadb/primary_db | 33 kB 00:00
remi-php56 | 2.9 kB 00:00
remi-php56/primary_db | 229 kB 00:00
remi-safe | 2.9 kB 00:00
remi-safe/primary_db | 950 kB 00:00
updates | 3.6 kB 00:00
updates/primary_db | 4.9 MB 00:04
.treeinfo | 1.1 kB 00:00
getting boot images...
vmlinuz-redhat-upgrade-tool | 4.7 MB 00:03
initramfs-redhat-upgrade-tool.img | 32 MB 00:24
setting up update...
finding updates 100% [=========================================================]
(1/323): MariaDB-10.2.14-centos6-x86_64-client.rpm | 48 MB 00:38
(2/323): MariaDB-10.2.14-centos6-x86_64-common.rpm | 154 kB 00:00
(3/323): MariaDB-10.2.14-centos6-x86_64-compat.rpm | 4.0 MB 00:03
(4/323): MariaDB-10.2.14-centos6-x86_64-server.rpm | 109 MB 01:26
(5/323): acl-2.2.51-12.el7.x86_64.rpm | 81 kB 00:00
(6/323): apr-1.4.8-3.el7.x86_64.rpm | 103 kB 00:00
(7/323): apr-util-1.5.2-6.el7.x86_64.rpm | 92 kB 00:00
(8/323): apr-util-ldap-1.5.2-6.el7.x86_64.rpm | 19 kB 00:00
(9/323): attr-2.4.46-12.el7.x86_64.rpm | 66 kB 00:00
...
(320/323): yum-plugin-fastestmirror-1.1.31-24.el7.noarch.rpm | 28 kB 00:00
(321/323): yum-utils-1.1.31-24.el7.noarch.rpm | 111 kB 00:00
(322/323): zlib-1.2.7-13.el7.x86_64.rpm | 89 kB 00:00
(323/323): zlib-devel-1.2.7-13.el7.x86_64.rpm | 49 kB 00:00
testing upgrade transaction
rpm transaction 100% [=========================================================]
rpm install 100% [=============================================================]
setting up system for upgrade
Finished. Reboot to start upgrade.

REBOOT

The upgrade procedure, will download all rpm packages to a directory and create a new grub entry. Then on reboot the system will try to upgrade the distribution release to it’s latest version.

# reboot
Categories
Electronics General Computing

Dell Monitor fades when displaying dark content

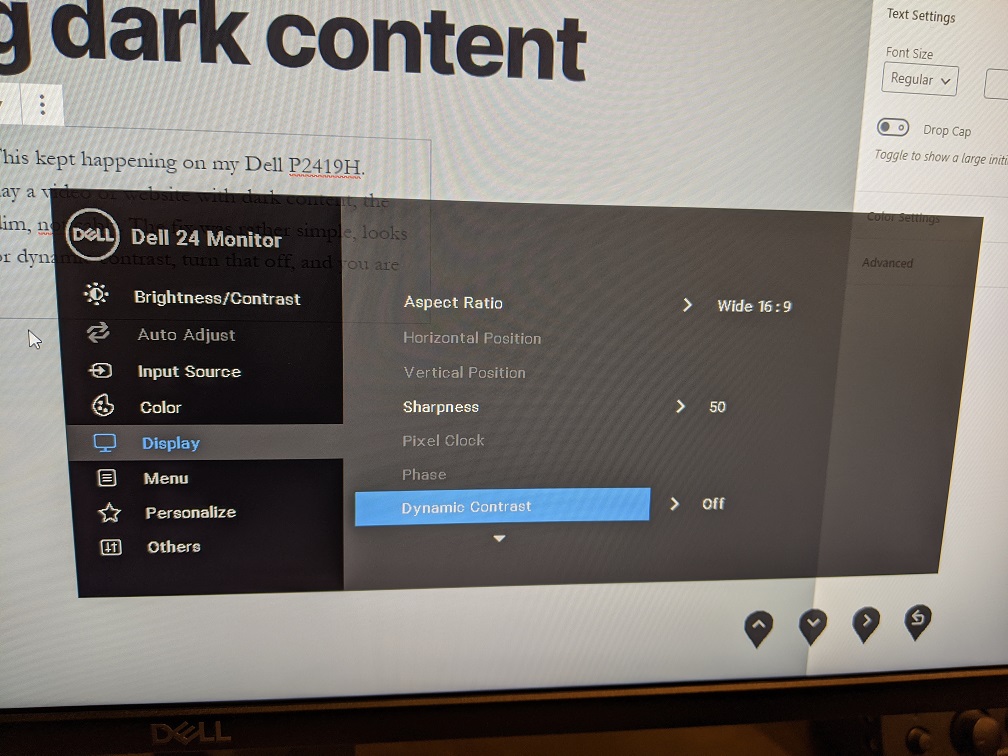
This was eating me up! This kept happening on my Dell P2419H. Every time I would display a video or website with dark content, the monitor would start to dim, noticeably. The fix was rather simple, looks like there is an option for dynamic contrast, turn that off, and you are good. Check out this image, hopefully your Dell monitor has this option.

Categories
Android Android Google

Disable profanity filter in Android 10

This is such a silly thing to have to disable, but any time I was using voice to text, it would always put asterisks for swear words. This is on my Google Pixel 3 XL running Android 10 latest update of Feb 2020. The fix was to disable it in THREE spots, not just one, not just two, but all three. The three spots are: Gboard, Google voice typing, and in the text correction section.

Section #1 Google Voice Typing:

Settings > System > Languages & input > Virtual keyboard > Google voice typing and make sure that Hide offensive words is disabled.

Section #2: Gboard

Settings > System > Languages & input > Virtual keyboard > Board -> Voice Typing -> Offline speech recognition and make sure that Hide offensive words is disabled.

Section #3: Text Correction

Settings > System > Languages & input > Virtual keyboard > Board -> Text Correction and make sure that Block offensive words is disabled.

Section #4: UPDATED (Added April 21 2020)

If those three options do NOT resolve it, the 4th option you can use is to disable offline voice: Settings > System > Languages & input > Virtual keyboard > Gboard > Voice Typing > and disable “faster voice typing“.

Categories
Operating Systems Windows 10

Quick and dirty robocopy script to back up directory

I used to have an xcopy script that ran this, but now I have upgraded to using robocopy to mirror my files to a network share that I disconnect and put in cold storage when not actually backing up.

robocopy E:\ \\192.168.50.30\backup\ /E /XD “System Volume Information” “$RECYCLE.BIN” “found.00*” /MIR

Break down of the script: E: is the SOURCE of my files and \\192.168.50.30\backup\ is my DESTINATION to copy TO. If you not the XD trigger, that EXCLUDES certain files. I want to ignore certain system files that do not matter to my back ups. You can do this for nearly any directory. /MIR is what actually MIRRORS the files, so they will look exactly like what you have on your SOURCE directory structure.

The only downside is there is no versioning with this, what you see is what you get, so if you were struck with some randomsware, this won’t save you. You would want something like seafile, or some other back up service. If there’s any interest, I can make a post on how to create a seafile server to do your back ups and version control. It has the added benefit of having versioning, browser accessible, and phone applications.

Categories
Server 2019

Windows Server 2019 Eval to Server Standard

I had issues converting an Eval server 2019 to a Standard Server 2019, and for whatever reason, it was painful to find the solution. Someone on reddit actually posted about it, so here is me documenting it for posterity!

# ISO Used: 17763.253.190108-0006.rs5_release_svc_refresh_SERVER_EVAL_x64FRE_en-us.iso

# Commands Executed:

DISM /online /Get-CurrentEdition
DISM /online /Get-TargetEditions
DISM /online /Set-Edition:ServerStandard /ProductKey:N69G4-B89J2-4G8F4-WWYCC-J464C /AcceptEULA

slmgr.vbs /upk
slmgr.vbs /ipk <MAK_KEY_HERE>
slmgr.vbs /ato

# Initial Product Key is GVLK (unable to find official source at present)

Unofficial GVLK Source

ProductGVLK
Windows Server 2019 DatacenterWMDGN-G9PQG-XVVXX-R3X43-63DFG
Windows Server 2019 StandardN69G4-B89J2-4G8F4-WWYCC-J464C
Windows Server 2019 EssentialsWVDHN-86M7X-466P6-VHXV7-YY726
Windows Server 2019 Azure CoreFDNH6-VW9RW-BXPJ7-4XTYG-239TB
Windows Server 2019 Datacenter Semi-Annual Channel (v.1809)6NMRW-2C8FM-D24W7-TQWMY-CWH2D
Windows Server 2019 Standard Semi-Annual Channel (v.1809)N2KJX-J94YW-TQVFB-DG9YT-724CC
Windows Server 2019 ARM64GRFBW-QNDC4-6QBHG-CCK3B-2PR88
Categories
vmware

Easiest way to install ESXi offline without any issues

I kept getting disk full issues when upgrading esx, this is such a silly error, and I really had no way around it outside of loading esx from a full iso and ilo in to boot. But I found a somewhat easier way to do it now via SSH and the upgrade update file.

  1. download the zip file from: https://my.vmware.com/group/vmware/patch#search
  2. upload it to a datastore
  3. Renamed it to update.zip – not required, but makes it easier
  4. esxcli software vib update -d /vmfs/volumes//update.zip
  5. reboot
  6. If complete, go ahead and delete the file if you want to reclaim the space.
Categories
Computer Hardware Dell

idrac6 Unable to boot on Virtual iso file

I was playing around with an older idrac 6 server Dell R210 ii and discovered this when I was trying to run a memtest remotely. It was a simple fix, although I wish the error was a little more obvious. The fix is to go to:

In the idrac 6 interface; go to system > console/media, then click configuration and enable virtual media, and click auto attach. Once you do that, click Apply.

I circled the options in the following image with handy dandy SNIP, ha ha.

Categories
Cisco

%ILET-1-AUTHENTICATION_FAIL on 2960X after IOS Update

I ran into this after updating a few 2960x’s with build dates of 2015. I attempted to down grade and had no luck with fixing. The research I did found 3 reasons the error popped up. Besides the error message popping up every 5 minutes or so, it killed all ip routing, making the switch useless. The exact error was:

%ILET-1-AUTHENTICATION_FAIL: This Switch may not have been manufactured by Cisco or with Cisco’s authorization.  This product may contain software that was copied in violation of Cisco’s license terms.  If your use of this product is the cause of a support issue, Cisco may deny operation of the product, support under your warranty or under a Cisco technical support program such as Smartnet.  Please contact Cisco’s Technical Assistance Center for more information.

The two fixes are to shut down the switch, and leave it unplugged for 10 minutes. The third requires an RMA. I ran into the third one sadly. I even tried the latest iOS as of August 25 2019. You can read more about the error here: https://www.cisco.com/c/en/us/support/docs/switches/catalyst-2960-x-series-switches/118837-technote-catalyst-00.html

Categories
Dell linux

ssh to reset dell idrac ip address and other variables

I was working on something with an IP conflict, and then locked myself out of routing via the VPN, so the quickest way to do a fix, was to change the IP of my idrac via command line. Apparently, you can do almost everything through command line.

First step is to get onto your idrac, replacing root and IP with your own information. Note, default username and password is root – calvin. If you have a newer idrac, I think starting around idrac8, there is a tab on the server that has the default idrac username and password:

  • ssh root@192.168.0.120
  • racadm
  • racadm getniccfg

You should now have a print out of your current configuration for your NIC. To change it, you just do the following:

  • racadm config -g cfgLanNetworking -o cfgNicIpAddress  192.168.0.140
  • racadm set iDRAC.IPv4.Address  192.168.0.140

Give it a few seconds, and it should kick you out, and now have the new IP address.

If you want a full subset of the documentation go here: http://ftp.dell.com/Manuals/all-products/esuprt_electronics/esuprt_software/esuprt_remote_ent_sys_mgmt/integrated-dell-remote-access-cntrllr-7-v1.30.30_User%27s%20Guide_en-us.pdf

Otherwise here is a snippet:

% Get all iDRAC settings in a file

racadm get -f config.txt

If you like you can change the contents of config.txt and apply it back to iDRAC
racadm set -f config.txt

% Set password for root user
racadm set iDRAC.Users.2.Password PASSWORD"

% List all ssh keys for root user
racadm sshpkauth -i 2 -v -k all

% Add ssh key to root user
racadm sshpkauth -i 2 -k 1 "CONTENTS OF PUBLIC KEY"

% Delete ssh key for root user
racadm sshpkauth -i 2 -d -k 1

% Get iDRAC IP config

racadm getniccfg
racadm get iDRAC.NIC

% set iDRAC IP

Using config command:
racadm config -g cfgLanNetworking -o cfgNicEnable 1
racadm config -g cfgLanNetworking -o cfgNicIpAddress x.x.x.x
racadm config -g cfgLanNetworking -o cfgNicNetmask 255.255.255.0
racadm config -g cfgLanNetworking -o cfgNicGateway x.x.x.x
racadm config -g cfgLanNetworking -o cfgNicUseDHCP 0
racadm config -g cfgLanNetworking -o cfgDNSServersFromDHCP 0
racadm config -g cfgLanNetworking -o cfgDNSServer1 y.y.y.y
racadm config -g cfgLanNetworking -o cfgDNSServer2 y.y.y.y
• Using set command:
racadm set iDRAC.Nic.Enable 1
racadm set iDRAC.IPv4.Address x.x.x.x
racadm set iDRAC.IPv4.Netmask 255.255.255.0
racadm set iDRAC.IPv4.Gateway x.x.x.x
racadm set iDRAC.IPv4.DHCPEnable 0
racadm set iDRAC.IPv4.DNSFromDHCP 0
racadm set iDRAC.IPv4.DNS1 y.y.y.y
racadm set iDRAC.IPv4.DNS2 y.y.y.y

% Set iDRAC DNS Name
racadm set iDRAC.NIC.DNSRacName iDRACNAME

% Set iDRAC domain name
racadm set iDRAC.NIC.DNSDomainName DOMAIN.NAME

% Set iDRAC DNS Server

racadm config -g cfgLanNetworking -o cfgDNSServer1 x.x.x.x
racadm config -g cfgLanNetworking -o cfgDNSServer2 y.y.y.y

% Set Front LCD to hostname
racadm set System.LCD.Configuration 16

% Reset iDRAC to factory defaults
racadm racresetcfg

% Reset/Reboot iDRAC

racadm racreset OPTIONS

Options : soft, hard, cold
or
racadm serveraction powercycle

% Get Serial number (service tag)
racadm getsvctag

% Get current system information
racadm getsysinfo

% Configure one-time-boot to PXE

racadm set BIOS.OneTimeBoot.OneTimeBootMode OneTimeBootSeq
racadm set BIOS.OneTimeBoot.OneTimeBootSeqDev NIC.Integrated.1-1-1

% Configure persistent Boot Device

racadm config -g cfgServerInfo -o cfgServerBootOnce 0
racadm config -g cfgServerInfo -i cfgServerFirstBootDevice HDD

% Check boot order list
racadm get BIOS.BiosBootSettings.bootseq

% Disable HyperThreading
racadm set BIOS.ProcSettings.LogicalProc Disabled

% Disable OS to iDRAC pass-thru for iDRAC service module (automatically create a pseudo NIC in OS)
racadm set iDRAC.OS-BMC.AdminState Disabled

% Change SNMP public community string
racadm set iDRAC.SNMP.AgentCommunity NEW STRING

% Disable ASR
racadm config -g cfgRacTuning -o cfgRacTuneAsrEnable 0

% Configure Serial redirection

racadm config -g cfgSerial -o cfgSerialConsoleEnable 1
racadm config -g cfgSerial -o cfgSerialBaudRate 115200
racadm config -g cfgSerial -o cfgSerialCom2RedirEnable 1
racadm config -g cfgSerial -o cfgSerialTelnetEnable 0
racadm config -g cfgSerial -o cfgSerialSshEnable 1

to access console via ssh console com2

% Disable Serial On Lan
racadm config -g cfgImpiSol -o cfgIpmiSolEnable 0

% Change Power Profile
racadm set BIOS.SysProfileSettings PerfPerWattOptimizedOs

% Set AC Power Recovery

racadm set BIOS.SysSecurity.AcPwdRcvry Last
racadm set BIOS.SysSecurity.AcPwdRcvryDelay Immediate

% Get RAID physical Disk information

racadm raid get pdisks
racadm raid get pdisks -o (all information)
racadm raid get pdisks -o -p state,size (specific information)

% Get RAID Virtual Disk Information
Racadm raid get vdisks