Categories
Cisco

%ILET-1-AUTHENTICATION_FAIL on 2960X after IOS Update

I ran into this after updating a few 2960x’s with build dates of 2015. I attempted to down grade and had no luck with fixing. The research I did found 3 reasons the error popped up. Besides the error message popping up every 5 minutes or so, it killed all ip routing, making the switch useless. The exact error was:

%ILET-1-AUTHENTICATION_FAIL: This Switch may not have been manufactured by Cisco or with Cisco’s authorization.  This product may contain software that was copied in violation of Cisco’s license terms.  If your use of this product is the cause of a support issue, Cisco may deny operation of the product, support under your warranty or under a Cisco technical support program such as Smartnet.  Please contact Cisco’s Technical Assistance Center for more information.

The two fixes are to shut down the switch, and leave it unplugged for 10 minutes. The third requires an RMA. I ran into the third one sadly. I even tried the latest iOS as of August 25 2019. You can read more about the error here: https://www.cisco.com/c/en/us/support/docs/switches/catalyst-2960-x-series-switches/118837-technote-catalyst-00.html

Categories
Dell linux

ssh to reset dell idrac ip address and other variables

I was working on something with an IP conflict, and then locked myself out of routing via the VPN, so the quickest way to do a fix, was to change the IP of my idrac via command line. Apparently, you can do almost everything through command line.

First step is to get onto your idrac, replacing root and IP with your own information. Note, default username and password is root – calvin. If you have a newer idrac, I think starting around idrac8, there is a tab on the server that has the default idrac username and password:

  • ssh root@192.168.0.120
  • racadm
  • racadm getniccfg

You should now have a print out of your current configuration for your NIC. To change it, you just do the following:

  • racadm config -g cfgLanNetworking -o cfgNicIpAddress  192.168.0.140
  • racadm set iDRAC.IPv4.Address  192.168.0.140

Give it a few seconds, and it should kick you out, and now have the new IP address.

If you want a full subset of the documentation go here: http://ftp.dell.com/Manuals/all-products/esuprt_electronics/esuprt_software/esuprt_remote_ent_sys_mgmt/integrated-dell-remote-access-cntrllr-7-v1.30.30_User%27s%20Guide_en-us.pdf

Otherwise here is a snippet:

% Get all iDRAC settings in a file

racadm get -f config.txt

If you like you can change the contents of config.txt and apply it back to iDRAC
racadm set -f config.txt

% Set password for root user
racadm set iDRAC.Users.2.Password PASSWORD"

% List all ssh keys for root user
racadm sshpkauth -i 2 -v -k all

% Add ssh key to root user
racadm sshpkauth -i 2 -k 1 "CONTENTS OF PUBLIC KEY"

% Delete ssh key for root user
racadm sshpkauth -i 2 -d -k 1

% Get iDRAC IP config

racadm getniccfg
racadm get iDRAC.NIC

% set iDRAC IP

Using config command:
racadm config -g cfgLanNetworking -o cfgNicEnable 1
racadm config -g cfgLanNetworking -o cfgNicIpAddress x.x.x.x
racadm config -g cfgLanNetworking -o cfgNicNetmask 255.255.255.0
racadm config -g cfgLanNetworking -o cfgNicGateway x.x.x.x
racadm config -g cfgLanNetworking -o cfgNicUseDHCP 0
racadm config -g cfgLanNetworking -o cfgDNSServersFromDHCP 0
racadm config -g cfgLanNetworking -o cfgDNSServer1 y.y.y.y
racadm config -g cfgLanNetworking -o cfgDNSServer2 y.y.y.y
• Using set command:
racadm set iDRAC.Nic.Enable 1
racadm set iDRAC.IPv4.Address x.x.x.x
racadm set iDRAC.IPv4.Netmask 255.255.255.0
racadm set iDRAC.IPv4.Gateway x.x.x.x
racadm set iDRAC.IPv4.DHCPEnable 0
racadm set iDRAC.IPv4.DNSFromDHCP 0
racadm set iDRAC.IPv4.DNS1 y.y.y.y
racadm set iDRAC.IPv4.DNS2 y.y.y.y

% Set iDRAC DNS Name
racadm set iDRAC.NIC.DNSRacName iDRACNAME

% Set iDRAC domain name
racadm set iDRAC.NIC.DNSDomainName DOMAIN.NAME

% Set iDRAC DNS Server

racadm config -g cfgLanNetworking -o cfgDNSServer1 x.x.x.x
racadm config -g cfgLanNetworking -o cfgDNSServer2 y.y.y.y

% Set Front LCD to hostname
racadm set System.LCD.Configuration 16

% Reset iDRAC to factory defaults
racadm racresetcfg

% Reset/Reboot iDRAC

racadm racreset OPTIONS

Options : soft, hard, cold
or
racadm serveraction powercycle

% Get Serial number (service tag)
racadm getsvctag

% Get current system information
racadm getsysinfo

% Configure one-time-boot to PXE

racadm set BIOS.OneTimeBoot.OneTimeBootMode OneTimeBootSeq
racadm set BIOS.OneTimeBoot.OneTimeBootSeqDev NIC.Integrated.1-1-1

% Configure persistent Boot Device

racadm config -g cfgServerInfo -o cfgServerBootOnce 0
racadm config -g cfgServerInfo -i cfgServerFirstBootDevice HDD

% Check boot order list
racadm get BIOS.BiosBootSettings.bootseq

% Disable HyperThreading
racadm set BIOS.ProcSettings.LogicalProc Disabled

% Disable OS to iDRAC pass-thru for iDRAC service module (automatically create a pseudo NIC in OS)
racadm set iDRAC.OS-BMC.AdminState Disabled

% Change SNMP public community string
racadm set iDRAC.SNMP.AgentCommunity NEW STRING

% Disable ASR
racadm config -g cfgRacTuning -o cfgRacTuneAsrEnable 0

% Configure Serial redirection

racadm config -g cfgSerial -o cfgSerialConsoleEnable 1
racadm config -g cfgSerial -o cfgSerialBaudRate 115200
racadm config -g cfgSerial -o cfgSerialCom2RedirEnable 1
racadm config -g cfgSerial -o cfgSerialTelnetEnable 0
racadm config -g cfgSerial -o cfgSerialSshEnable 1

to access console via ssh console com2

% Disable Serial On Lan
racadm config -g cfgImpiSol -o cfgIpmiSolEnable 0

% Change Power Profile
racadm set BIOS.SysProfileSettings PerfPerWattOptimizedOs

% Set AC Power Recovery

racadm set BIOS.SysSecurity.AcPwdRcvry Last
racadm set BIOS.SysSecurity.AcPwdRcvryDelay Immediate

% Get RAID physical Disk information

racadm raid get pdisks
racadm raid get pdisks -o (all information)
racadm raid get pdisks -o -p state,size (specific information)

% Get RAID Virtual Disk Information
Racadm raid get vdisks
Categories
General Computing

Issues adding passwords on MySQL 10 or newer

I was trying to create a password for a new user on a new install of webmin. I was trying out the latest everything, latest MySQL (MariaDB 10), PHP 7.3, Kernel 5.0.2.12 running on Centos 7. But for some reason, when adding a new SQL user, I kept getting: failed :

Password hash should be a 41-digit hexadecimal number

What I had to do was enter the hash of the password into the new user script. To get the hash, all you have to do it go to command line, enter:

mysql -u root -h localhost -p

Then enter your passwords, and enter your password you want to kick back the hash on:

SELECT PASSWORD(‘mypass’);

Which will kick out:

6C8989366EAF75BB670AD8EA7A7FC1176A95CEF4

Poof, now you can enter that as your password via your gui, or as an SQL command:

If you would like to read more about it, check here:

https://dev.mysql.com/doc/refman/5.6/en/password-hashing.html

Categories
General Computing

Need a replacement for speed test by ookla?

I’ve been using fast.com, powered by Netflix and it’s been working great. I was getting annoyed with ooklas somewhat intrusive ad tactics and was looking for something a little better. Fast.com works great and has a great little application door Android as well.

Categories
Computer Hardware Windows 10

microsoft surface pro 6 battery bar stuck at 100%

You would think this is a good thing, but no, haha. It’s nice to know what your battery is actually at. While the tablet was logged in, I did this key combo, and that resolved it:

hold volume + and power button for 15 seconds and that should fix it.

Categories
Gaming General Computing Video Cards

nvidia color settings resetting after reboot

I am using the nvidia settings to manage some color settings, and as of a recentish anniversary update for windows 10, it kept resetting every reboot. Luckily someone at Tom’sHardware found the resolution, which I am shamelessly posting here with source:

This issue is caused by the WindowsColorSystem scheduled task running at user logon. The NVIDIA driver hooks the user’s logon and then applies the settings, however, the Microsoft scheduled task that initializes the Windows Color System runs just after and loads the default color profile for the monitor (timing issue). Since I prefer to use the driver manufacturers’ control panels to manage my color settings, I disable the “Task Scheduler Library\Microsoft\Windows\WindowsColorSystem\Calibration Loader” task.

Categories
Computer Hardware Gaming

ncase m1 v5 and i9 9900k work great

I just built my new rig, and the temps are solid. When running a stock blend test, I am getting about 70-75C. I could use more fans, I am only running the two on the cooler, and 1 120mm case fan.

ncase m1 v5
nvidia 1080 gtx FE
ADATA SX8200 PCIE NVME GEN3X4 m.2 2280 960GB ASX8200NP-960GT-C
ADATA XPG GAMMIX D10 16GB (2x8GB) DDR4 3200 (PC4 21300) AX4U320038G16-DB10
ASRock Z390 PHANTOM GAMING-ITX/AC LGA 1151
Intel i9 9900k
be quiet! dark rock TF air cooler
Corsair SF600

The only issue I had was some slight fitment with the be quiet cooler. I made zero alterations, but you can see it’s definitly a little tight with the Ram, as it’s pushing it a smidge. Not enough to worry me though. If I had lower profile sticks, it’d be fine.

Categories
Plex

Using plex locally while on openVPN

Do you have a windows server running openvpn, and your plex server at home? If you ever wanted the ability to have plex work local, vice over the internet and back in while you are at home, it’s pretty simple. This will work on any client side openvpn config file. You just need to add this one route in the config file:

route plex.tv 255.255.255.0 192.168.1.1

replace 192.168.1.1 with whatever your router IP address is, boom, problem solved. There used to be a few other domains you have to route, and some IP addresses you had to keep track of, but now plex made it easy, just plex.tv works. I had the issue where anytime I had openvpn running and connected on this server, my tablet connected on the same subnet would try to route traffic for my plex application over the internet. When I went to play a video it would say “you are not direct connected, do you want to play this file still”? This resolved it, and running a tcpdump on my firewall, I see the traffic is not leaving, huzzah!

Categories
Dell Servers

Dell idrac6 enterprise update – getting Dell iDRAC undefined” and “The webpage cannot be found” errors

I kept getting these errors when I would log into my older idrac 6 cards. You can fixing it by putting IE11 into compatability mode, but I also found it easier to update the idrac to the latest 2.91 version. These were the errors I was getting:

I updated one as far back as 1.43 to this version, no middle version required. Enjoy! I pulled these files right off of dells website. The only file you need to upload is the firming.d6. It was taken out of the ESM_Firmware_MXKG2_WN32_2.91_A00.EXE.

Dell iDRAC Monolithic Release 2.91
http://vivithemage.com/extra/Dell-11G/firmimg.d6

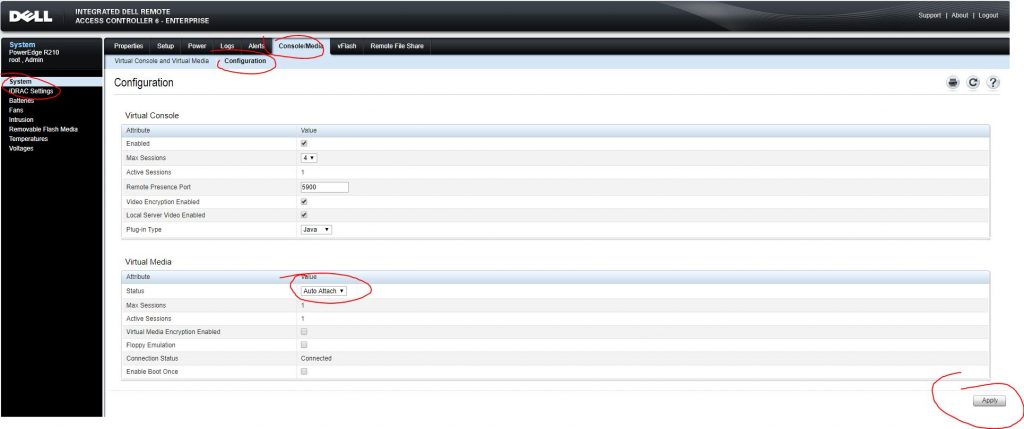
If you want to use the virutal console, you will probably have to switch from native to JAVA, as native was not working for me in my old firefox version, or IE11, even with compatibility enabled.

Categories
Dell Servers

No update is available error in Dell 11G and older servers workaround

I had this issue updating my older R410, R610, and R710 servers the other day. You can still update idrac 6 via idrac, but they have since decomissioned ftp.dell.com as the repo for the lifecycle controller for some lame reason, see:
“Due to LC memory limitations only in 11G servers, Dell Engineering had to remove all 11G firmware and BIOS Dell Update Packages (DUPs) from the LC Catalog. The change was necessary due to the LC Catalog’s growing size, as it also added BIOS and firmware versions for 12G, 13G, and 14G servers being introduced.”

Luckily they made a work around that can be found here:
https://www.dell.com/support/article/us/en/04/sln310452/lifecycle-controller-lc-firmware-update-error-no-update-is-available-on-any-11g-server?lang=en
If that no longer works, here is a snippet of it:

Lifecycle Controller (LC) Firmware Update error “No update is available” on any 11G server

No update is available. Make sure that the Windows(R) catalog and Dell(TM) Update Packages for Windows(R) are used.

This is working as designed as of March 2018. Due to LC memory limitations only in 11G servers, Dell Engineering had to remove all 11G firmware and BIOS Dell Update Packages (DUPs) from the LC Catalog. The change was necessary due to the LC Catalog’s growing size, as it also added BIOS and firmware versions for 12G, 13G, and 14G servers being introduced.

Note that LC Firmware Update continues to work normally with all 12G – 14G servers. Catalog-based tools that can update 11G firmware such as OpenManage Essentials (OME) or System Center Updates Publisher (SCUP) will also still identify and push applicable 11G updates, since they can push and run DUPs “in-band” on the target host’s operating system, which has no memory limitations like LC.

To ensure the BIOS and firmware for your 11G servers are kept up-to-date, the suggested workaround is to use Dell Repository Manager (DRM) (I also got a copy of DRMInstaller_3.0.1.423.exe just in case that take it down, which you can get here: http://vivithemage.com/extra/Dell-11G/) to select the applicable 11G server models and then export a smaller custom Catalog that 11G LC can process. DRM can either:

Export both the custom Catalog.xml catalog and various DUP packages to an ISO image or directory intended to be stored on a file share that LC can access.
Export just the custom Catalog.xml file, which by default still points LC Update online to ftp.dell.com, making it unecessary to download all applicable DUPs to a local site.
Follow the steps below to export the custom Catalog in DRM:

In the main DRM homepage, click the “Add Repository” button.
Give the repository a name and choose the newest dated “Enterprise Server Catalog” in the “Base Catalog” menu.
Select the “Manual” tab and then click the “Custom” button under “Select Systems,” then click “Choose Systems.”
Only select “PowerEdge” in the “Line of Business” menu, and then click on each applicable 11G server model to move it into the “Selected Systems” list.
Click “Save” to return.
Click the “Custom” button under “Operating Systems,” then the “Choose” button.
Under the “Operating Systems” menu, choose only “Windows-32” and no other OSs.
IMPORTANT: A custom LC catalog can only list either Windows 32-bit or 64-bit DUPs, not both. All applicable 11G firmware and BIOS updates are still in the Windows 32-bit format, unlike newer server models. Do not choose Linux as 11G cannot process the Linux DUP format.
Click “Windows Server 2008 X64” to add to the “Selected Operating Systems” list, then click “Save.”
Under the “Components” section, simply choose “All component types” then click “Add.”
Once the new repository is added to the main DRM homepage, check its box and click the “Export” button.
There are several export formats available. Choosing “SUU ISO” exports the Catalog to an image file that LC Update can load via local or iDRAC virtual media. Otherwise, if you intend to mount the custom catalog in LC from a remote file share, choose the “Share” tab and then click “Browse” to specify a local directory path to save the Catalog.xml file and (optionally) all of the downloaded DUPs.
If the target hosts are intended to each connect online directly to ftp.dell.com, then check “Export only catalog.” Otherwise all Windows 32-bit DUPs applicable to the selected 11G server models will also be downloaded to the same local directory. This could make the directory large in size depending on how many DUPs are applicable.
Copy the directory containing the Catalog.xml file (and possible DUPs) to the intended file share server.
Once booted into LC Firmware Update, choose the appropriate file share protocol (FTP, CIFS, etc.) to connect to the remote file share containing Catalog.xml.

Quick Tips content is self-published by the Dell Support Professionals who resolve issues daily. In order to achieve a speedy publication, Quick Tips may represent only partial solutions or work-arounds that are still in development or pending further proof of successfully resolving an issue. As such Quick Tips have not been reviewed, validated or approved by Dell and should be used with appropriate caution. Dell shall not be liable for any loss, including but not limited to loss of data, loss of profit or loss of revenue, which customers may incur by following any procedure or advice set out in the Quick Tips.